本文章的实践代码提交在:https://github.com/luozhiyun993/skill-workflow
本文将深度解析 Agent Skill 的模块化设计:从 Skill 间的层级调用、工具脚本的自动化执行,到 Subagent 的专业化分工。我们将通过“小红书爆款生产线”这一实战案例,展示如何利用文件传递、状态追踪与清单模式,解决复杂任务中上下文过载与输出不可控的痛点。告别臃肿的单一 Prompt,让你的 Agent Workflow 变得可验证、可断点续传且高度精准。
skill 有哪些玩法?
skill 调用 skill
有时候任务比较复杂,我们就可以抽取出不同的 skill,通过 skill 之间的调用来简化单个 skill 的复杂度,或者可以把一些公用到的 skill 抽取出来,变成单一的 skill。
比如我们每次在开发完之后都需要:运行测试,本地合并到基础分支、推送并创建 Pull Request,那么我们就可以创建一个 finishing-a-development-branch skill,然后在其他的 skill 里面指定调用:
### Step 5: Complete Development

After all tasks complete and verified:
- Announce: "I'm using the finishing-a-development-branch skill to complete this work."
- **REQUIRED SUB-SKILL:** Use finishing-a-development-branch skill
- Follow that skill to verify tests, present options, execute choice
skill 调用工具脚本
比如我们可以在 skill 里面指定使用方法,运行脚本,以及输出结果是什么,让 agent 自动执行:
## 使用方法

这是一个基于 TypeScript 的脚本 Skill。

### 运行脚本

# 在项目根目录下运行
npx ts-node .claude/skills/demo.ts

### 输出结果

脚本运行后,会在 workflow-agent/outputs/demo/ 目录下生成两个文件:

1.  demo_[timestamp].json: 原始数据。
2.  tdemo_analysis_[timestamp].md: Claude 生成的分析报告。
创建可验证的中间输出
当 Claude 执行复杂、开放式的任务时,它可能会出错。假设你让克劳德根据电子表格更新 PDF 中的 50 个表单字段,我们就可以通过添加一个中间的 changes.json 文件,在应用更改之前对其进行验证。工作流程变为:分析 → 创建文件 → 验证 → 执行 → 验证。
这一步特别重要:所有中间结果都保存成本地文件。
三个好处:
- 可追溯:出问题了能看到每一步的输出
- 可断点续传:中途停了,下次从上次的位置继续
- 可人工干预:不满意某一步的结果,手动改完让 Agent 继续
比如我们可以这样在 SKILL 里面指定文件的存放目录以及存放格式:
## Instructions

When this skill is invoked:

1. Create the `./input` directory if it doesn't exist
2. Get the user's input message (passed as arguments or prompt for it)
3. Generate a timestamp-based filename (format: `YYYY-MM-DD_HH-MM-SS.txt`)
4. Save the input to `./input/<timestamp>.txt`
5. Confirm the file has been saved with the full path
skill 调用 subagent
skill 里面是可以调用 subagent 的,subagent 有几个优势是:context 独立,可以并发执行,并且是可以进行专业化分工的,那么我们就可以在 skill 在有需要的时候调用 subagent,提升执行效率,比如下面我创建了一个 go-file-author-attribution agent,那么在 skill 里面就可以指明调用:
 **Batch Process Files**
   - For each eligible file, use the Task tool to invoke the `go-file-author-attribution` agent
   - Pass the author name and file path to the agent
   - Process files sequentially to avoid conflicts
但是如果这样简单的调用,有时候会把一大段内容直接塞给 subagent,上下文窗口很快就撑满了。但如果只传路径,subagent 自己去读文件,上下文就干净很多。
Subagent 之间只传文件路径,不传内容,这条规则很重要。
比如可以设置一个 writer-agent 启动时只需要三个参数:source 文件路径、analysis 文件路径、outline 文件路径。它自己读取内容,写完保存到指定路径,返回输出文件路径。
这样做还有个好处:可以并行启动多个 subagent。三个 writer-agent 同时跑,各自处理一个提纲方案,互不干扰。
对于复杂的要求可以使用 reference
在 skill 里面通常来说,不建议把所有的信息都平铺到 SKILL.md 里面,因为上下文太长会浪费很多不必要的 token,并且让 agent 不够聚焦,那么我们可以使用 reference 的方式提供外部的文档提供:
## References

See `references/` folder for detailed documentation:
- `bdi-ontology-core.md` - Core ontology patterns and class definitions
- `rdf-examples.md` - Complete RDF/Turtle examples
- `sparql-competency.md` - Full competency question SPARQL queries
- `framework-integration.md` - SEMAS, JADE, LAG integration patterns
常见的 pattern
清单模式
将复杂的操作分解成清晰的、循序渐进的步骤。对于特别复杂的流程,提供一份清单 checklist,这样可以让 agent 逐步勾选完成,如下所示:
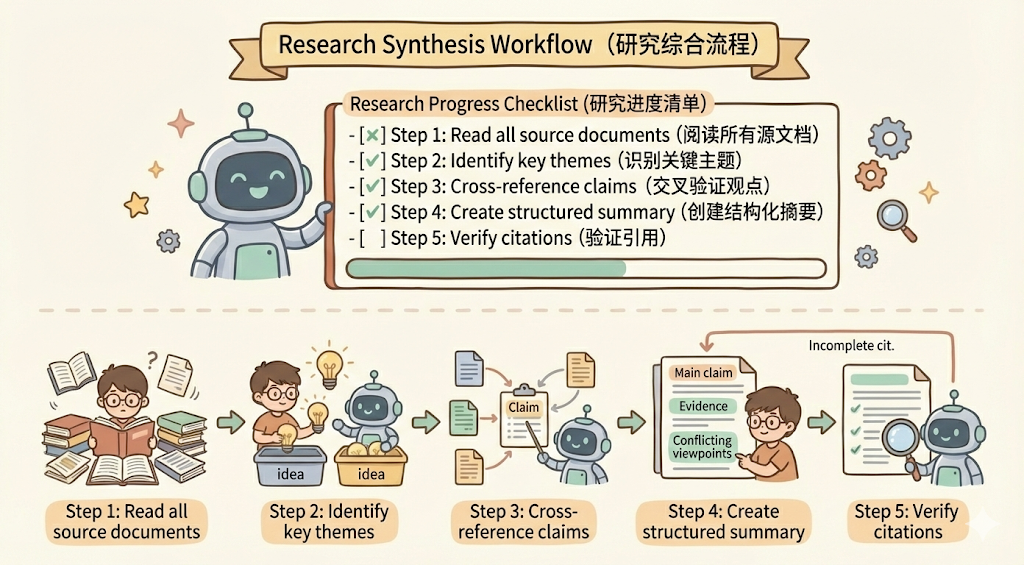
## Research synthesis workflow

Copy this checklist and track your progress:

Research Progress:
- [ ] Step 1: Read all source documents
- [ ] Step 2: Identify key themes
- [ ] Step 3: Cross-reference claims
- [ ] Step 4: Create structured summary
- [ ] Step 5: Verify citations

**Step 1: Read all source documents**

Review each document in the sources/ directory. Note the main arguments and supporting evidence.

**Step 2: Identify key themes**

Look for patterns across sources. What themes appear repeatedly? Where do sources agree or disagree?

**Step 3: Cross-reference claims**

For each major claim, verify it appears in the source material. Note which source supports each point.

**Step 4: Create structured summary**

Organize findings by theme. Include:
- Main claim
- Supporting evidence from sources
- Conflicting viewpoints (if any)

**Step 5: Verify citations**

Check that every claim references the correct source document. If citations are incomplete, return to Step 3.
除此之外,也可以让 claude 在 workflow 里面去执行代码,比如把代码放入到 scripts 中,我们可以看一下 claude pdf skill 的目录结构:
.
├── forms.md
├── LICENSE.txt
├── reference.md
├── scripts
│   ├── check_bounding_boxes_test.py
│   ├── check_bounding_boxes.py
│   ├── check_fillable_fields.py
│   ├── convert_pdf_to_images.py
│   ├── create_validation_image.py
│   ├── extract_form_field_info.py
│   ├── fill_fillable_fields.py
│   └── fill_pdf_form_with_annotations.py
└── SKILL.md
在 SKILL.md 里面直接指明什么时候去调用脚本: `python scripts/check_fillable_fields <file.pdf>。
下面提供一个demo:
## PDF form filling workflow
Copy this checklist and check off items as you complete them:
Task Progress:
- [ ] Step 1: Analyze the form (run analyze_form.py)
- [ ] Step 2: Create field mapping (edit fields.json)
- [ ] Step 3: Validate mapping (run validate_fields.py)
- [ ] Step 4: Fill the form (run fill_form.py)
- [ ] Step 5: Verify output (run verify_output.py)
**Step 1: Analyze the form**
Run: python scripts/analyze_form.py input.pdf
This extracts form fields and their locations, saving to fields.json.
**Step 2: Create field mapping**
Edit fields.json to add values for each field.
**Step 3: Validate mapping**
Run: python scripts/validate_fields.py fields.json
Fix any validation errors before continuing.
**Step 4: Fill the form**
Run: python scripts/fill_form.py input.pdf fields.json output.pdf
**Step 5: Verify output**
Run: python scripts/verify_output.py output.pdf
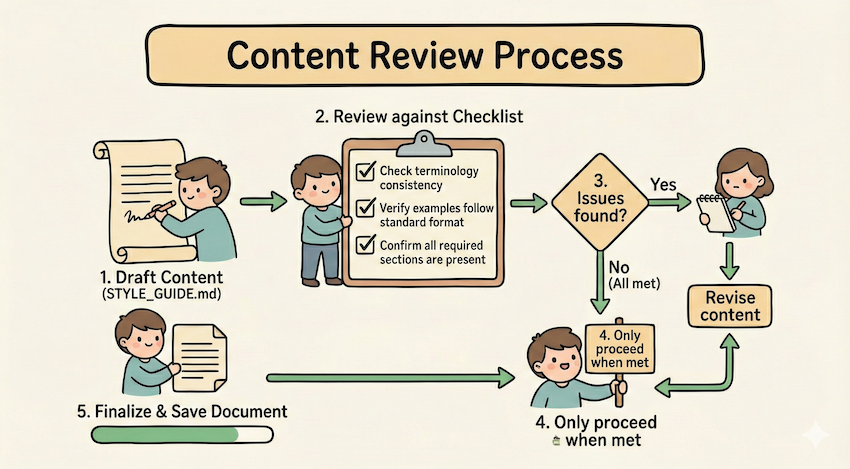
If verification fails, return to Step 2.循环验证模式
通过 Run validator → fix errors → repeat 这种循环模式来不断提升输出的质量

## Content review process

1. Draft your content following the guidelines in STYLE_GUIDE.md
2. Review against the checklist:
   - Check terminology consistency
   - Verify examples follow the standard format
   - Confirm all required sections are present
3. If issues found:
   - Note each issue with specific section reference
   - Revise the content
   - Review the checklist again
4. Only proceed when all requirements are met
5. Finalize and save the document
比如上面的例子中,使用 STYLE_GUIDE.md 作为验证器,agent 通过通过读取和比较来执行检查,不通过则循环修改之后再进行验证。
条件工作流模式
我们可以在 md 里面引导 agent 做出条件选择,运行符合条件的 workflow :
## Document modification workflow

1. Determine the modification type:

   **Creating new content?** → Follow "Creation workflow" below
   **Editing existing content?** → Follow "Editing workflow" below

2. Creation workflow:
   - Use docx-js library
   - Build document from scratch
   - Export to .docx format

3. Editing workflow:
   - Unpack existing document
   - Modify XML directly
   - Validate after each change
   - Repack when complete
Examples pattern
我们可以在 skill 里面提供示例以提升 agent 的能力,最好可以明确 input/output 这样更明确,如下所示:
## Commit message format

Generate commit messages following these examples:

**Example 1:**
Input: Added user authentication with JWT tokens
Output:

feat(auth): implement JWT-based authentication

Add login endpoint and token validation middleware

**Example 2:**
Input: Fixed bug where dates displayed incorrectly in reports
Output:

fix(reports): correct date formatting in timezone conversion

Use UTC timestamps consistently across report generation
模板 pattern
比如我们现在输出的结果就是需要按照一定要求输出,那么我们可以在 skill 提供模版,让 agent 按照模版输出:
## Report structure

ALWAYS use this exact template structure:

# [Analysis Title]

## Executive summary
[One-paragraph overview of key findings]

## Key findings
- Finding 1 with supporting data
- Finding 2 with supporting data
- Finding 3 with supporting data

## Recommendations
1. Specific actionable recommendation
2. Specific actionable recommendation
实战:用 skill 解决 workflow 编排任务
一般的情况,我们用 传统workflow的做法(比如在dify里),需要这么做:
- 打开可视化编辑器
- 拖一个“输入节点”
- 连接到“LLM节点”,配置prompt
- 再连接到“调用API节点”
- 最后连接到“输出节点”
- 测试、调试、再测试…
但是如果用 skill 就完全不需要这样,比如可以简单的用我上面讲的 pattern 就足够实现一套比较复杂的 workflow了。
比如目前要搭建一个一个小红书热门爆款写作的workflow,首先是从热门网站爬取,然后分析爆款热点,再来写作,最后输出到小红书,那么整个 workflow 的编排任务也可以通过 skill 来完成。
那么我们可以这样编排 workflow:
.claude/
├── skills/
│   ├── workflow-runner/         # 核心编排引擎
│   │   ├── SKILL.md             # 解析 YAML 并调度任务的指令
│   │   └── workflow_schema.json  # 约束 workflow.yaml 的格式
│   ├── web-scraper/             # 基础采集工具
│   │   ├── SKILL.md             # 爬虫调用指令
│   │   └── scripts/             # 存放 Python/Playwright 爬虫脚本
│   └── xhs-utils/               # 小红书专用工具箱
│       ├── SKILL.md             # 包含格式化、Emoji 注入、标签生成逻辑
│       └── templates/           # 爆款文案模板库
├── agents/                      # 专门化的 Sub-agents 定义
│   ├── crawl-agent.md           # 负责从乱码网页中清洗出有效信息的 Agent
│   ├── trend-analyst-agent.md   # 负责拆解爆款逻辑、提炼“钩子”的 Agent
│   └── xhs-writer-agent.md      # 负责不同人格化写作的文案 Agent
└── workspace/                   # 运行时的中转站 (执行过程中动态生成)
    └── xhs-factory/             # 存放 raw_data, analysis, drafts 等中间文件
我上面这套 workflow 可以利用到 skill 和 subagent 相互协调来实现。skill 主要用来运行脚本和润色;subagent 因为有单独的context,所以将拆分的任务并发执行,提升处理效率。
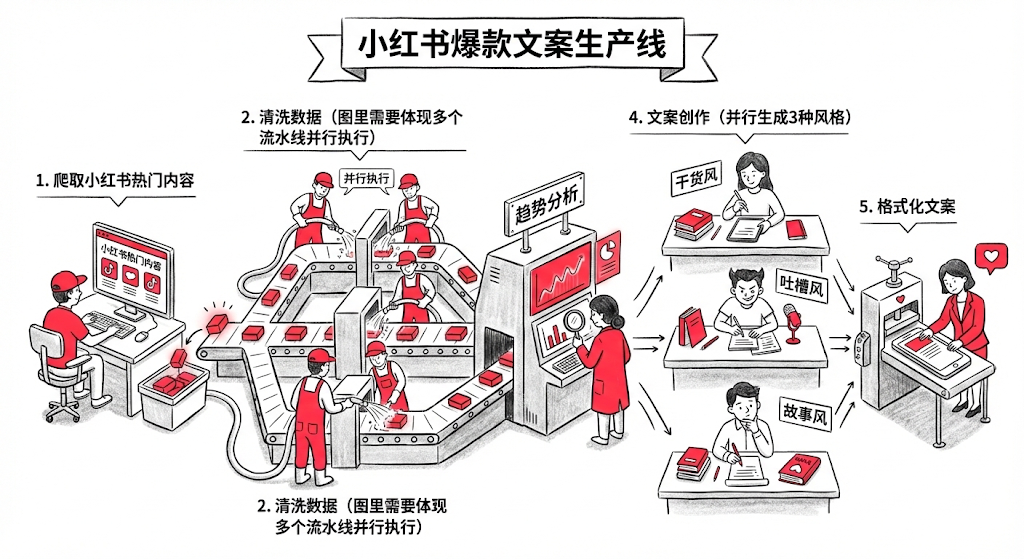
第一步:执行编排 workflow-runner (编排器) ,它会通过读取配置,我把它定义为 xhs_vlog.yaml,它里面规定了执行步骤,以及输出到什么文件夹:
name: "小红书爆款文案生产线"
version: "1.0"
workspace: "workspace/xhs-factory"

steps:
  # 步骤 1:爬取小红书热门内容
  - id: scraping_stage
    type: skill
    skill: web-scraper
    params:
      target: "xiaohongshu_trending"  # 爬取小红书首页热门
      limit: 20                        # 爬取20篇热门笔记
      output_dir: "{{workspace}}/raw_data"

  # 步骤 2:清洗数据
  - id: cleaning_stage
    type: agent
    agent: crawl-agent
    depends_on: [scraping_stage]
    params:
      input: "{{steps.scraping_stage.output}}"
      output: "{{workspace}}/cleaned_data.json"

  # 步骤 3:趋势分析
  - id: analysis_stage
    type: agent
    agent: trend-analyst-agent
    depends_on: [cleaning_stage]
    params:
      input: "{{steps.cleaning_stage.output}}"
      output: "{{workspace}}/analysis/hooks_and_patterns.json"

  # 步骤 4:文案创作(并行生成3种风格)
  - id: writing_stage
    type: agent
    agent: xhs-writer-agent
    mode: parallel                    # 并行执行
    depends_on: [analysis_stage]
    params:
      styles: ["干货风", "吐槽风", "故事风"]
      analysis: "{{steps.analysis_stage.output}}"
      output_dir: "{{workspace}}/drafts"

  # 步骤 5:格式化文案
  - id: formatting_stage
    type: skill
    skill: xhs-utils
    depends_on: [writing_stage]
    params:
      drafts_dir: "{{steps.writing_stage.output}}"
      output_dir: "{{workspace}}/final"
然后通过设置 run_state.json文件的方式每完成一个步骤,agent 必须强制更新这个文件,然后上一步和下一步通过 ouput 来进行对接,每一步完成之后会标记状态和完成时间,比如这样:
{
  "workflow_file": ".claude/workflows/xhs_vlog.yaml",
  "workspace": "workspace/xhs-factory",
  "current_step_id": "writing_stage",
  "global_context": {},
  "steps": {
    "scraping_stage": {
      "status": "completed",
      "output": "workspace/xhs-factory/raw_data",
      "timestamp": "2026-01-19T14:17:19.344205",
      "error": null
    },
    "cleaning_stage": {
      "status": "completed",
      "output": "workspace/xhs-factory/cleaned_data.json",
      "timestamp": "2026-01-19T14:22:17.638192",
      "error": null
    },
    "analysis_stage": {
      "status": "completed",
      "output": "workspace/xhs-factory/analysis/hooks_and_patterns.json",
      "timestamp": "2026-01-19T14:29:11.210193",
      "error": null
    },
    "writing_stage": {
      "status": "completed",
      "output": "workspace/xhs-factory/drafts",
      "timestamp": "2026-01-19T14:34:22.027580",
      "error": null
    },
    "formatting_stage": {
      "status": "pending",
      "output": null,
      "timestamp": null,
      "error": null
    }
  }
}
第二步:原子执行 web-scraper (Skill),Skill 会调用运行 Python 脚本进行网站的爬取,脚本运行成功并生成文件后,Runner 立即将 scrapping_stage 标记为 completed,并写入文件到当前项目的 raw_data 文件夹;
第三步:启动 crawl-agent 批量的对抓取的页面进行数据清洗,并且在 crawl-agent.md 文件中还用示例的方式指出了输出格式:
[
  {
    "id": "note_0",
    "title": "绝绝子!这个方法让我一周瘦了5斤",
    "content": "姐妹们,今天分享一个超好用的减肥方法...",
    "likes": 12000,
    "comments": 456,
    "favorites": 0,
    "tags": ["减肥", "健康", "生活方式"],
    "published_at": null
  }
]第四步:启动并行创作xhs-writer-agent,启动多个 subagent 完成不同风格的文案写作工作,比如我在 agent 里面规定了三种风格,可以根据自己的运营经验进行微调:
### 干货风
- **标题**:数字+动词+效果(如"3招让你的皮肤嫩到发光✨")
- **开头**:直接抛出核心价值,吸引读者
- **正文**:步骤拆解,每步用 emoji 标记,内容具体可操作
- **结尾**:总结+互动引导(如"姐妹们快试试吧💕")
- **长度**:300-500字

### 吐槽风
- **标题**:痛点+共鸣(如"姐妹们,别再踩这些坑了!😭")
- **开头**:描述痛点场景,引发共鸣
- **正文**:吐槽+解决方案+对比,情绪化表达
- **结尾**:反转或金句收尾
- **长度**:250-400字
第五步:执行汇总格式化 xhs-utils (Skill),只有当 run_state.json 显示所有创作子任务都为 completed 时,才会触发最后的格式化 Skill。
最终生成的文件全部都通过文件来传递,可以极大的减少 token 的消耗:
└── workspace
    └── xhs-factory
        ├── analysis
        │   └── hooks_and_patterns.json
        ├── cleaned_data.json
        ├── drafts
        │   ├── 吐槽风.md
        │   ├── 干货风.md
        │   └── 故事风.md
        ├── final
        │   ├── 吐槽风_final.md
        │   ├── 干货风_final.md
        │   └── 故事风_final.md
        ├── raw_data
        │   ├── note_0.json
        │   ├── ....
        │   └── note_9.json
        └── run_state.json
总结
Agent Skill 的核心魅力在于它将大模型的逻辑能力与软件工程的模块化思想深度融合。通过这篇文章的实践,我们可以体会到几个比较有用的实践:
- 告别“上下文焦虑”: 通过 Subagent + 文件传递 的模式,我们将原本臃肿的单一对话拆解为独立任务。Subagent 之间只传路径、不传内容,这不仅极大地节省了 Token 成本,更保证了每个节点都能在“干净”的上下文中发挥极致的专业性。
- 变“不可控”为“可验证”: 引入 中间输出 (JSON/Markdown) 和 清单模式 (Checklist),让 Agent 的执行过程从“黑盒”变成了“白盒”。你不仅可以随时通过本地文件追溯错误,还能实现断点续传和人工微调。
- 低成本的灵活性: 相比于 Dify 等可视化工具的繁琐配置,基于 Skill 的编排只需要几段简单的指令和 YAML 配置。这种“以文档驱动流程”的方式,让开发者能像写代码一样快速迭代 AI 的业务逻辑。
Reference
https://x.com/dotey/status/2010176124450484638
https://platform.claude.com/docs/en/agents-and-tools/agent-skills/best-practices