
转载请声明出处哦~,本篇文章发布于luozhiyun的博客:https://www.luozhiyun.com
本文使用的Istio源码是 release 1.5。
这篇文章打算讲一下sidecar,我在刚学习Istio的时候会有一些疑惑,sidecar是如何做到无感知的注入的,很多学习资料都没有详细去讲这部分的内容,下面打算解析一下。
Sidecar 介绍
在Sidecar部署方式中会为每个应用的容器部署一个伴生容器。对于Istio,Sidecar接管进出应用程序容器的所有网络流量。
使用 Sidecar 模式部署服务网格时,无需在节点上运行代理,但是集群中将运行多个相同的 Sidecar 副本。在 Kubernetes 的 Pod 中,在原有的应用容器旁边运行一个 Sidecar 容器,可以理解为两个容器共享存储、网络等资源,可以广义的将这个注入了 Sidecar 容器的 Pod 理解为一台主机,两个容器共享主机资源。
Sidecar 注入过程
注入 Sidecar的时候会在生成pod的时候附加上两个容器:istio-init、istio-proxy。istio-init这个容器从名字上看也可以知道它属于k8s中的Init Containers,主要用于设置iptables规则,让出入流量都转由 Sidecar 进行处理。istio-proxy是基于Envoy实现的一个网络代理容器,是真正的Sidecar,应用的流量会被重定向进入或流出Sidecar。
我们在使用Sidecar自动注入的时候只需要给对应的应用部署的命名空间打个istio-injection=enabled标签,这个命名空间中新建的任何 Pod 都会被 Istio 注入 Sidecar。
应用部署后我们可以通过kubectl describe查看pod内的容器:
 [root@localhost ~]# kubectl describe pod details-v1-6c9f8bcbcb-shltm

 Name:         details-v1-6c9f8bcbcb-shltm
Namespace:    default
...
Labels:       app=details
              pod-template-hash=6c9f8bcbcb
              security.istio.io/tlsMode=istio
              service.istio.io/canonical-name=details
              service.istio.io/canonical-revision=v1
              version=v1
Annotations:  sidecar.istio.io/status:
                {"version":"3bc68d1f27d8b6b9bf1cb3e9904f5d5f8c2ecab1c93d933fbb3d0db76fae2633","initContainers":["istio-init"],"containers":["istio-proxy"]...
Status:       Running
IP:           172.20.0.14
IPs:
  IP:           172.20.0.14
Controlled By:  ReplicaSet/details-v1-6c9f8bcbcb
Init Containers:
  istio-init:
    Container ID:  docker://6d14ccc83bd119236bf8fda13f6799609c87891be9b2c5af7cbf7d8c913ce17e
    Image:         docker.io/istio/proxyv2:1.5.10
    Image ID:      docker-pullable://istio/proxyv2@sha256:abbe8ad6d50474814f1aa9316dafc2401fbba89175638446f01afc36b5a37919
    ...
    Ready:          True
    Restart Count:  0
    ...
Containers:
  details:
    Container ID:   docker://ed216429216ea1b8a1ba20960590edb7322557467c38cceff3c3e847bcff0a14
    Image:          docker.io/istio/examples-bookinfo-details-v1:1.15.1
    Image ID:       docker-pullable://istio/examples-bookinfo-details-v1@sha256:344b1c18703ab1e51aa6d698f459c95ea734f8317d779189f4638de7a00e61ae
    ...
  istio-proxy:
    Container ID:  docker://a3862cc8f53198c8f86a911089e73e00f4cc4aa02eea05aaeb0bd267a8e98482
    Image:         docker.io/istio/proxyv2:1.5.10
    Image ID:      docker-pullable://istio/proxyv2@sha256:abbe8ad6d50474814f1aa9316dafc2401fbba89175638446f01afc36b5a37919
    ...
    Ready:          True
details-v1-6c9f8bcbcb-shltm这个应用是我们在上篇文章中创建的一个details服务,里面有istio-init、istio-proxy、details这三个container。
Sidecar 注入原理
Sidecar 注入主要是依托k8s的准入控制器Admission Controller来实现的。
准入控制器会拦截 Kubernetes API Server 收到的请求,拦截发生在认证和鉴权完成之后,对象进行持久化之前。可以定义两种类型的 Admission webhook:Validating 和 Mutating。Validating 类型的 Webhook 可以根据自定义的准入策略决定是否拒绝请求;Mutating 类型的 Webhook 可以根据自定义配置来对请求进行编辑。
我们可以看看配置详情:
[root@localhost ~]# kubectl get mutatingwebhookconfiguration istio-sidecar-injector -o yaml

apiVersion: admissionregistration.k8s.io/v1
kind: MutatingWebhookConfiguration
metadata:
  annotations:
    ...
  creationTimestamp: "2020-10-18T08:22:01Z"
  generation: 2
  labels:
    app: sidecar-injector
    operator.istio.io/component: Pilot
    operator.istio.io/managed: Reconcile
    operator.istio.io/version: 1.5.10
    release: istio
  ...
webhooks:
- admissionReviewVersions:
  - v1beta1
  clientConfig:
    caBundle: ...
    service:
      name: istiod
      namespace: istio-system
      path: /inject
      port: 443
  failurePolicy: Fail
  matchPolicy: Exact
  name: sidecar-injector.istio.io
  namespaceSelector:
    matchLabels:
      istio-injection: enabled
  rules:
  - apiGroups:
    - ""
    apiVersions:
    - v1
    operations:
    - CREATE
    resources:
    - pods
    scope: '*'
  ...
这里有一个namespaceSelector,match的标签是istio-injection: enabled的命名空间,请求规则rules是CREATE,表示匹配所有pod的创建请求。当apiserver收到一个符合规则的请求时,apiserver会给 Webhook 服务发送一个准入审核的请求,在上面的配置中webhook指定的是一个叫istiod的service。
[root@localhost ~]# kubectl get svc --namespace=istio-system | grep istiod
istiod                      ClusterIP      10.68.222.38    <none>        15012/TCP,443/TCP
                                                  32h
通常Sidecar注入由以下步骤完成:
- 解析Webhook REST请求,将AdmissionReview原始数据反序列化;
- 解析pod,将AdmissionReview中的AdmissionRequest反序列化;
- 利用Pod及网格配置渲染Sidecar配置模板;
- 利用Pod及渲染后的模板创建Json Patch;
- 构造AdmissionResponse;
- 构造AdmissionReview,将其发给apiserver;
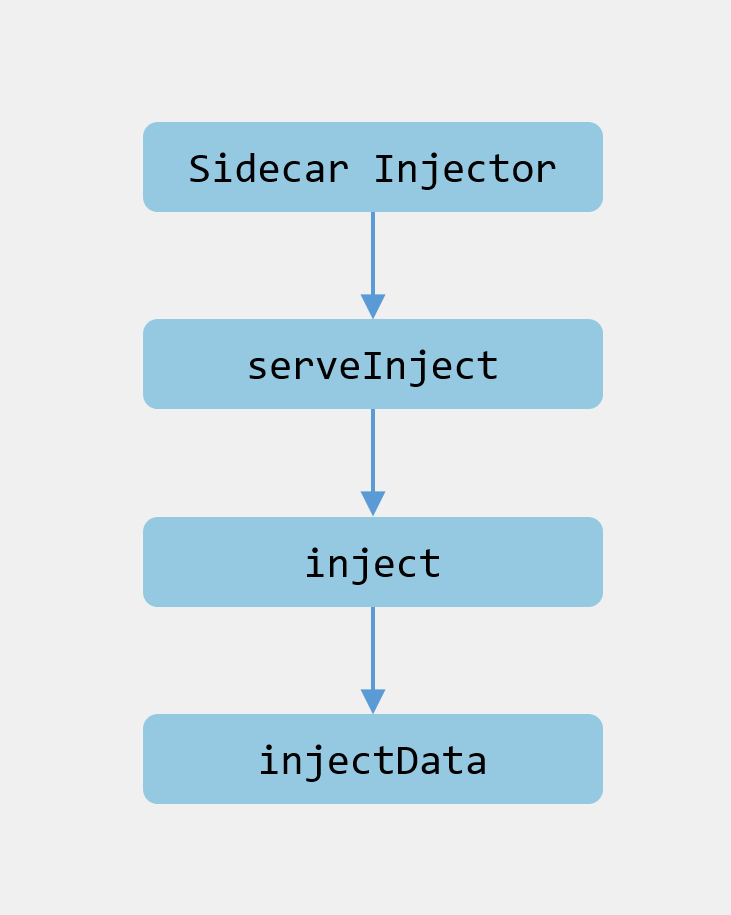
源码流程差不多是这个样子:
下面我们来看看源码。
源码位置:pkg/kube/inject/webhook.go
func NewWebhook(p WebhookParameters) (*Webhook, error) {
    wh := &Webhook{
        ...
    }
    ...
    if p.Mux != nil {
        p.Mux.HandleFunc("/inject", wh.serveInject)
        mux = p.Mux
    } else {
        wh.server = &http.Server{
            Addr: fmt.Sprintf(":%v", p.Port),
            TLSConfig: &tls.Config{GetCertificate: wh.getCert},
        }
        mux = http.NewServeMux()
        mux.HandleFunc("/inject", wh.serveInject)
        wh.server.Handler = mux
    }
    ...
}
在初始化Webhook实例的时候会注册/inject对应的处理器,也就是当apiserver回调/inject请求的时候会调用到serveInject方法中。
然后我们进入到serveInject方法中:
文件位置:pkg/kube/inject/webhook.go
func (wh *Webhook) serveInject(w http.ResponseWriter, r *http.Request) {
    totalInjections.Increment()
    var body []byte
    if r.Body != nil {
        //读取请求体
        if data, err := ioutil.ReadAll(r.Body); err == nil {
            body = data
        }
    }
    ...
    var reviewResponse *v1beta1.AdmissionResponse
    ar := v1beta1.AdmissionReview{}
    //解码请求体
    if _, _, err := deserializer.Decode(body, nil, &ar); err != nil {
        handleError(fmt.Sprintf("Could not decode body: %v", err))
        reviewResponse = toAdmissionResponse(err)
    } else {
        //解码成功调用inject方法,并传入AdmissionReview
        reviewResponse = wh.inject(&ar)
    }
    //构建AdmissionReview作为参数返回给调用方
    response := v1beta1.AdmissionReview{}
    if reviewResponse != nil {
        response.Response = reviewResponse
        if ar.Request != nil {
            response.Response.UID = ar.Request.UID
        }
    }

    resp, err := json.Marshal(response)
    if err != nil {
        log.Errorf("Could not encode response: %v", err)
        http.Error(w, fmt.Sprintf("could not encode response: %v", err), http.StatusInternalServerError)
    }
    if _, err := w.Write(resp); err != nil {
        log.Errorf("Could not write response: %v", err)
        http.Error(w, fmt.Sprintf("could not write response: %v", err), http.StatusInternalServerError)
    }
}
这个方法很简单,主要就是读取请求体并解码,然后调用inject方法,构建AdmissionReview作为参数返回给调用方。
主要逻辑从这里可以看出都在inject方法里面,下面看看这个方法:
func (wh *Webhook) inject(ar *v1beta1.AdmissionReview) *v1beta1.AdmissionResponse {
    req := ar.Request
    var pod corev1.Pod
    //json反序列化请求数据
    if err := json.Unmarshal(req.Object.Raw, &pod); err != nil {
        handleError(fmt.Sprintf("Could not unmarshal raw object: %v %s", err,
            string(req.Object.Raw)))
        return toAdmissionResponse(err)
    }

    ...
    //封装模板数据
    spec, iStatus, err := InjectionData(wh.Config.Template, wh.valuesConfig, wh.sidecarTemplateVersion, typeMetadata, deployMeta, &pod.Spec, &pod.ObjectMeta, wh.meshConfig.DefaultConfig, wh.meshConfig) // nolint: lll
    if err != nil {
        handleError(fmt.Sprintf("Injection data: err=%v spec=%v\n", err, iStatus))
        return toAdmissionResponse(err)
    }
    ...
    //将需要注入的有istio-init/istio-proxy container封装成patch操作
    //具体可以看这里:https://kubernetes.io/zh/docs/reference/access-authn-authz/extensible-admission-controllers/#response
    patchBytes, err := createPatch(&pod, injectionStatus(&pod), annotations, spec, deployMeta.Name)
    if err != nil {
        handleError(fmt.Sprintf("AdmissionResponse: err=%v spec=%v\n", err, spec))
        return toAdmissionResponse(err)
    }

    log.Debugf("AdmissionResponse: patch=%v\n", string(patchBytes))
    //将需要patch的配置封装成AdmissionResponse返回
    reviewResponse := v1beta1.AdmissionResponse{
        Allowed: true,
        Patch:   patchBytes,
        PatchType: func() *v1beta1.PatchType {
            pt := v1beta1.PatchTypeJSONPatch
            return &pt
        }(),
    }
    totalSuccessfulInjections.Increment()
    return &reviewResponse
}
inject方法逻辑主要分为以下几个步骤:
- json反序列化请求数据到pod中;
- 调用InjectionData根据模板封装数据,主要是构造istio-init、istio-proxy等容器配置;
- 调用createPatch方法将模板数据转化成json形式,到时候在创建容器的时候会patch到创建容器的配置中,具体可以看这里:https://kubernetes.io/zh/docs/reference/access-authn-authz/extensible-admission-controllers/#response
- 最后将数据封装成AdmissionResponse返回;
总结
本篇文章重点讲解Sidecar容器注入实现原理,通过使用k8s的准入控制器来做到在每个新建的pod里面都无感知的创建sidecar做流量托管。
Reference
https://github.com/istio/istio.io/blob/release-1.1/content/blog/2019/data-plane-setup/index.md
https://kubernetes.io/docs/reference/access-authn-authz/extensible-admission-controllers/
https://kubernetes.io/docs/reference/access-authn-authz/admission-controllers/
https://jimmysong.io/blog/envoy-sidecar-injection-in-istio-service-mesh-deep-dive/